How to use NetGuard + personalDNSFilter+ Any VPN, without root, without external self-hosted servers.
No root or external servers neeeded. Requirements: Android 5.0+, 446.03 MB of available storage, a computer and a cable to connect your phone.

Together, with the people over at the personalDNSfilter Telegram group, we've discovered a way to run multiple "VPN"s at the same time by taking advantage of work profiles.
All of this started because I was trying to control Work-profile apps using the Netguard instance that I had on my main profile.
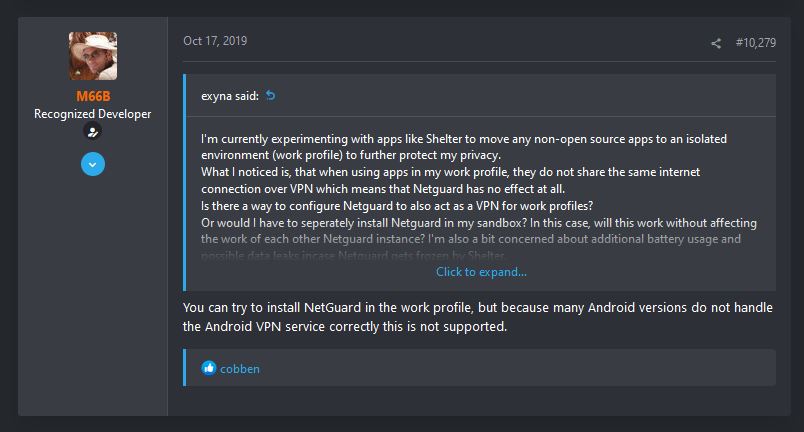
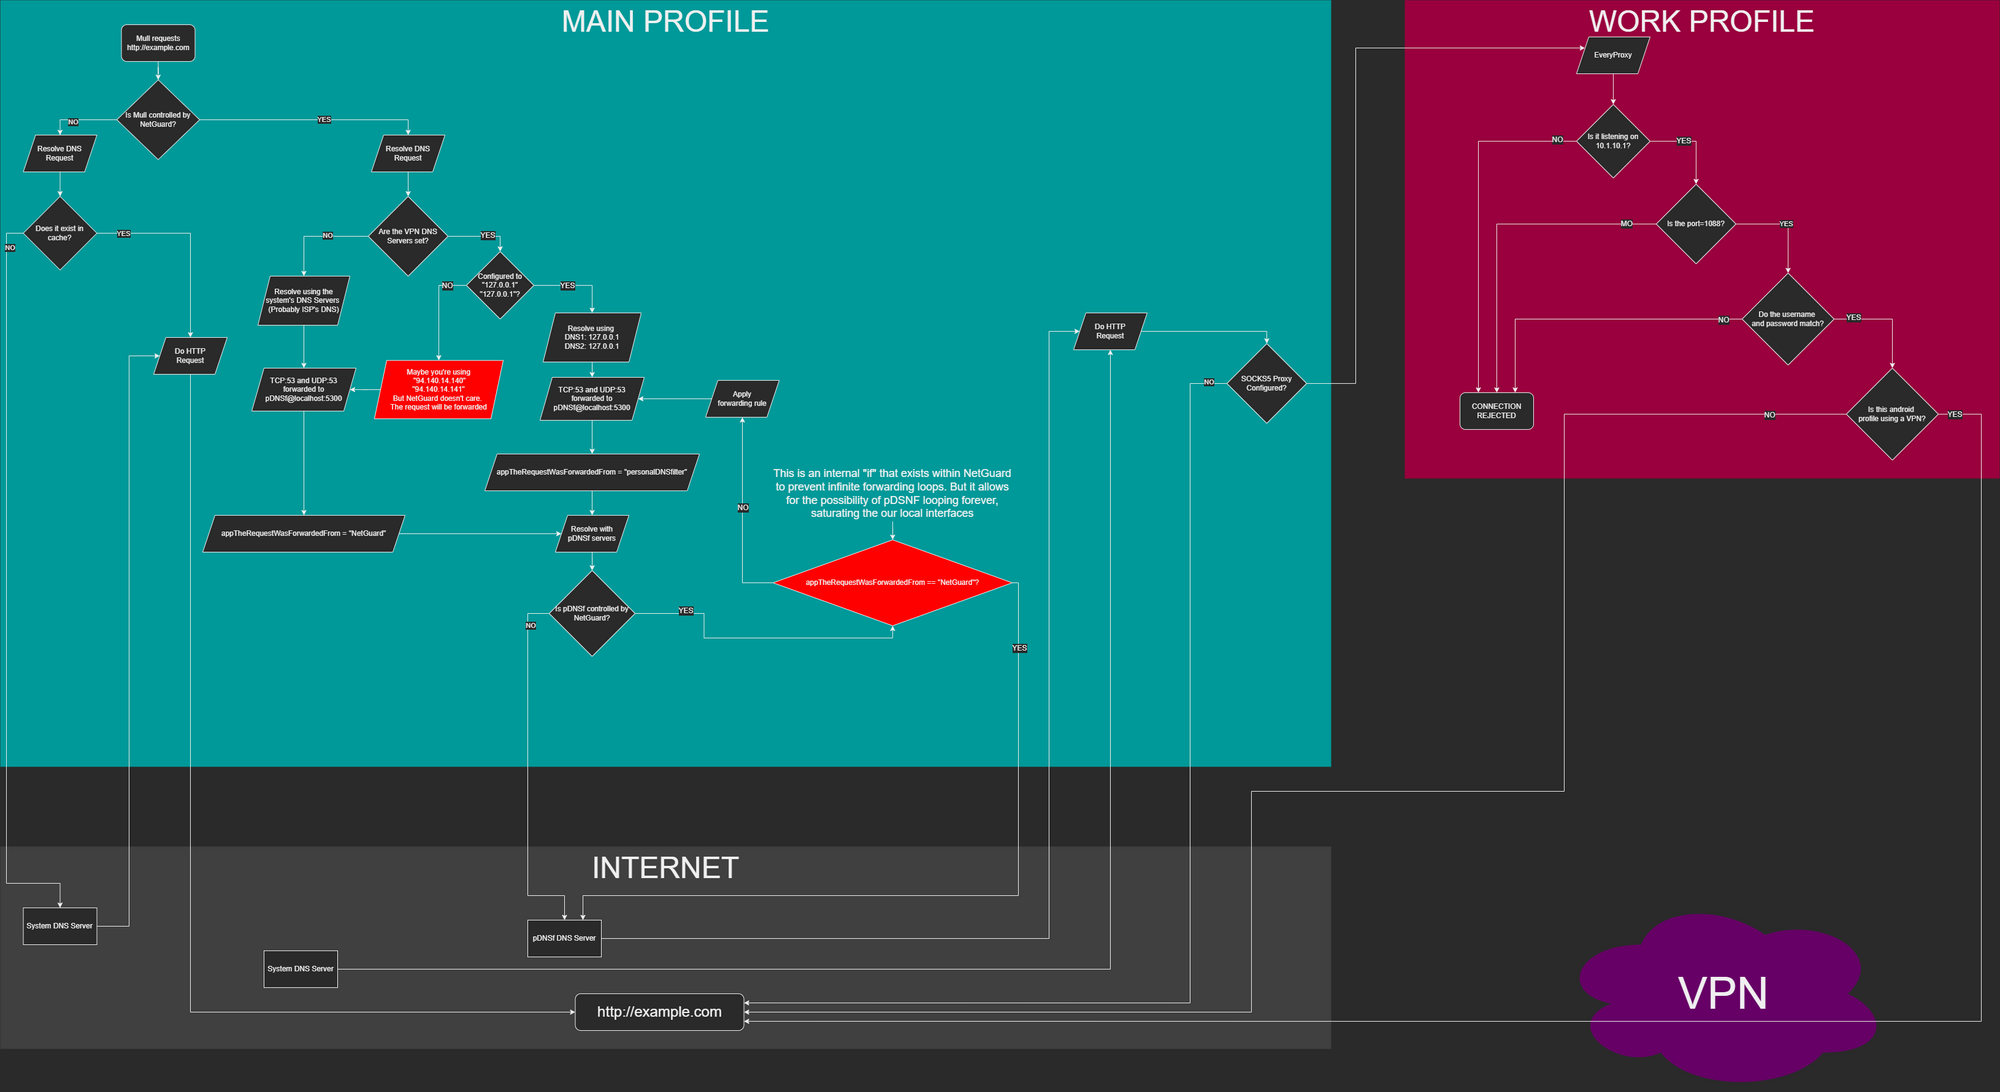
After I read that comment from the Netguard dev, I realized that the work profile had a separate VPN slot, so therefor, it's possible for us to have an actual VPN and a SOCKS5 proxy server in the work profile, and then connect to this SOCKS5 proxy from the main profile using NetGuard. Below is a flowchart of how this whole thing is going to work:
Don't worry, the rest of this blog was written in a non-technical way, so it's easy to follow for non-technical people.
This has been tested on Android 9, on a Moto e6 plus. This blog assumes that you already know:
- How to install an APK
- How to use ADB
Requirements
- Android 5.0+
- 446.03 MB (446,030,000 bytes) of available storage
- (Optional, hopefully) A computer and a cable to connect your phone to the computer.
Why so much storage?
| Item | Size |
|---|---|
| Work Profile: Island + ProtonVPN + SOCKS5 Proxy + System stuff | 398.53MB |
| NetGuard | 17.09MB |
| personalDNSFilter | 5.67MB |
| Island | 24.74MB |
| TOTAL | 446.03MB |
Setup caveats
WARNING: UDP LEAKS
Netguard does not currently support sending UDP traffic over the SOCKS5 proxy. This causes protocols which use UDP (such as HTTP/2 and HTTP/3) to ignore the proxy and go over the clearnet, completely bypassing this setup. Until this issue is resolved, there's two possible solutions.
Solution #1: Replace Netguard and personalDNSfilter with "Rethink DNS + Firewall"
Unlike Netguard, RethinkDNS supports UDP tunneling through a SOCKS5 proxy. RethinkDNS doesn't have DNS leaks, and you can use the "Block connections without VPN" android setting with it. If you're a networking pro, you should be able to do that using this guide as a vague reference; but if you're not as technically inclined, read on:
Solution #2: Use mull with custom about:config settings
If you just want to use a browser, you can keep Netguard and personalDNSfilter. But you'll have to use Mull (a hardened fork of Firefox for Android) with "network.http.http2.enabled = false", and "network.http.http3.enable = false" in about:config. You must do this to avoid leaks with this setup because HTTP versions greater than v1.1 use UDP.
If instead you want to use the Tor browser, you don't need to change any settings, since Tor does not use, nor support UDP.
If you're 100% sure that the app(s) you'll use do not use UDP, you can continue with this specific setup. If you're not sure, then rest assured that at least Tor can be used safely with this setup, but allowing any other apps through the firewall risks revealing your identity to the web services you interact with.
Scroll down to the TL;DR to see other possible ways to use a Firewall and a VPN at the same time.
DNS Leaks if personalDNSfilter isn't initialized
DNS queries will leak through the clearnet if personalDNSfilter isn't initialized once traffic is being routed through Netguard. To prevent any possible leaks, make sure personalDNSfilter is initialized before enabling the SOCKS5 proxy in Netguard.
This issue has been brought up to the developer of Netguard, and he's been unable to determine the cause.
I'd like to thank "FLAGEL" for briging these issues to my attention.
Battery usage
Because we're running multiple profiles and apps at the same time, this setup is fairly energy hungry. NetGuard and personalDNSfilter have a very small battery footprint, but the Android work profile is very resource intensive.
Unsupported devices
Some brands/devices do not fully support using a VPN in the work profile. To quote M66B (emphasis added):
NetGuard is supported in the primary profile only. It might or might not work in other profiles, but this scenario is not supported because is basically isn't supportable. I have wasted enough time on trying to support this in the past.
Something like "Shelter" is not standard Android and a manufacturer modification, which is the core problem because these modifications often do not take the Android VPN service into account too.
This setup might or might not work in your device, so make sure you test it before doing anything "risky". This guide is known not to work on some LG devices running Android 9. I've personally tested it in a Moto e6 plus with stock Android 9 and it works well.
There's many ways you can use a Firewall and a VPN at the same time (sorted from easiest to most complicated):
- Use Adhell 3, the Samsung KNOX based content-blocker that doesn't require root and also allows you to use a VPN app at the same time.
- Use AFWall+ (root required) instead of NetGuard. That way you can have a firewall and still use VPN apps "normally".
- Install a VPN app and a SOCKS5 proxy server in the Android work profile, and then connect to this SOCKS5 proxy from the main profile using NetGuard.
- Use a VPN provider that already offers a SOCKS5 proxy (like Mullvad), and then connect to this SOCKS5 proxy from NetGuard (Not recommended due to Netguard's UDP issues, and SOCKS5 not being encrypted)
- Self-host a VPN-to-SOCKS5 server (Not recommended due to Netguard's UDP issues, and SOCKS5 not being encrypted)
Also see: https://android.stackexchange.com/questions/182341/how-to-use-a-firewall-and-a-vpn/247835#247835
I've only ever used the highlighted option, so that's what I'll describe here.
Pros:
- It doesn't require root
- You don't have to pay for a specific VPN (you can use Proton VPN)
- You don't have to run/pay for any servers
Cons:
- NetGuard leaks the UDP packets to the clearnet. An alternative solution is to use RethinkDNS instead of Netguard, or use only a browser that has HTTP/2 & HTTP/3 disabled through about:config, or use only the Tor Browser (because Tor doesn't use nor support UDP). Any other traffic will be leaked.
- The work profile has to be enabled constantly for the VPN to stay running, and that uses a considerable ammount of battery.
- The Android work profile requires about 398.53MB of storage.
- The VPN service doesn't fully work on some Android devices: It's known not to work in some LG devices running Android 9, but it does work in a Moto e6 Plus running Android 9.
Steps:
- Install personalDNSfilter
- Install Island or Shelter (Preferibly Shelter, because it's FOSS and has no trackers)
- Setup Island/Shelter
- Setup personalDNSfilter to your liking
- Install "Every Proxy" in the work profile
- Install a VPN app (such as Proton VPN) in the work profile
- Disable battery optimizations for all of the apps you just installed (personalDNSfilter, Every Proxy, Proton VPN, and Island/Shelter)
- Configure "Every Proxy" to run a SOCKS5 proxy on the 10.1.10.1 interface, and set a username and password (Warning: do not make the password 126 characters long, that causes a crash. I recommend making the password 40 characters long.)
- Make sure NetGuard is running
- Start the SOCKS5 proxy in "Every Proxy"
- Set personalDNSfilter in Netguard as "unmanaged" (untick the "apply rules and conditions" box)
- In Netguard set the DNS servers to any WAN servers (for example: 94.140.14.14, and 94.149.14.15) (nothing will be sent to these servers)
- Create TCP and UDP forwarding rules for 127.0.0.1:53 -> 127.0.0.1:5300 to personalDNSfilter in NetGuard. Note that this isn't possible if you downloaded NetGuard from the google playstore. You must download netguard from either Github or from F-Droid
- Configure Netguard to use a SOCKS5 proxy server (10.1.10.1:1088, and input the same username and password as you did in "Every Proxy")
Glossary
Work Profiles
Island and Shelter are apps which take advantage of Android's work-profile in order to create a "sandbox"; Using this sandbox, we can give privacy invasive apps their own "private data pools", aka, their own storage for:
- SMS History
- Call History
- File Storage
Having a separate profile on android also allows you to have multiple versions of a single app running simultaneously without modifying the app's APK. In contrast to other "parallel apps" apps, this approach allows us to easily get security updates from the playstore, as the app doesn't have to be re-signed in the first place.
There's also the benefit of being able to hide an app from another app (For example, hiding Lucky Patcher from a game).
And lastly, but most important, a work profile allows us to have two VPNs at the same time.
F-Droid
F-Droid is an app store and software repository for Android, serving a similar function to the Google Play store. The main repository, hosted by the project, contains only free and open source apps. Applications can be browsed, downloaded and installed from the F-Droid website or client app without the need to register for an account.
SOCKS5 Proxy
SOCKS is an Internet protocol that exchanges network packets between a client and server through a proxy server. SOCKS5 optionally provides authentication so only authorized users may access a server. Practically, a SOCKS server proxies TCP connections to an arbitrary IP address, and provides a means for UDP packets to be forwarded.
Network Port
In computer networking, a port is a communication endpoint. At the software level, within an operating system, a port is a logical construct that identifies a specific process or a type of network service. A port is identified for each transport protocol and address combination by a 16-bit unsigned number, known as the port number. The most common transport protocols that use port numbers are the Transmission Control Protocol (TCP) and the User Datagram Protocol (UDP).
A port number is always associated with an IP address of a host and the type of transport protocol used for communication. It completes the destination or origination network address of a message. Specific port numbers are reserved to identify specific services so that an arriving packet can be easily forwarded to a running application. For this purpose, port numbers lower than 1024 identify the historically most commonly used services and are called the well-known port numbers. Higher-numbered ports are available for general use by applications and are known as ephemeral ports.
IP Address
An Internet Protocol address (IP address) is a numerical label such as 192.0.2.1 that is connected to a computer network that uses the Internet Protocol for communication.[1][2] An IP address serves two main functions: network interface identification and location addressing.
Internet Protocol version 4 (IPv4) defines an IP address as a 32-bit number.[2] However, because of the growth of the Internet and the depletion of available IPv4 addresses, a new version of IP (IPv6), using 128 bits for the IP address, was standardized in 1998.[3][4][5] IPv6 deployment has been ongoing since the mid-2000s.
IP addresses are written and displayed in human-readable notations, such as 192.0.2.1 in IPv4, and 2001:db8:0:1234:0:567:8:1 in IPv6. The size of the routing prefix of the address is designated in CIDR notation by suffixing the address with the number of significant bits, e.g., 192.0.2.1/24, which is equivalent to the historically used subnet mask 255.255.255.0.
TL;DR: Your phone can have multiple IP Addresses (aka Network connections), and every port must be associated with an IP Address.
Index
Setup
Island or Shelter?
We must install one of these two apps. Island contains Google trackers, but it has a bigger userbase, therefor, less bugs. Meanwhile, Shelter is completely open-source, but has a smaller userbase. For this tutorial I'll be using Island, since that's what I'm currently using, but feel free to use Shelter if you prefer so.
1) Download the app: https://play.google.com/store/apps/details?id=com.oasisfeng.island&gl=US
2) Launch the app and follow the setup instructions given by Island.
On most middle to high end Android devices released after 2016, Island can be setup straightforward without hassle. But still on some devices, you may got “incompatible with your device” message on Google Play Store, or be notified during the setup with error message “Sorry, your device (or ROM) is incompatible with Island”, or other failures. In these cases, Island could probably still work on your device if setup manually.
If you are prompted to encrypt your device during the setup, it means your device was not pre-encrypted out of box. If you don’t want device decription (which may significantly degrade overall I/O performance on some low-end devices), it can be avoided with manual setup.
You will need a PC and a cable to connect your phone to your PC if you follow the manual setup guide.
While you're at it, you might also want to setup these cool (but not necessary for this guide) features:
Island allows you to freeze any app in the work profile. Freezing an app blocks all its background behaviors. You can even create a launch shortcut for quick de-freezing and launching.
If you enable the "Managed mainland" feature you can also freeze apps that are in the main profile. Link to setup guide.
AppOps allows you to set some app permissions to "ignored", which make it so that the app thinks that it does have a permission, but when it tries to actually use it, it doesn't get any data. AppOps has work-profile support.
Netguard
Netguard is a FOSS app that allows us to control exactly which apps have access to the internet, and which don't. We can give an app WiFi access, mobile data access, or make it so that netguard doesn't control the app at all.
Installing the app
Here, we have two options: Installing from GitHub, or installing from F-Droid. We can't install netguard from the playstore because the playstore release doesn't support port-forwarding, and that feature is obligatory for us to be able to do our trick.
I recommend installing NetGuard from F-Droid, since it's easier to update it from there. If you don't already have an F-Droid client, I recommend using AuroraDroid. Simply download the APK file, and install it. After opening the app and finishing the setup, search for "NetGuard" and install the first result.
I recommend spending some time fine-tweaking which apps you give internet access to. Most apps only ask for internet access to show you ads/collect analytics.
Why personalDNSfilter?
The Netguard version from github already has hosts blacklists, so why not use just that? Well, Netguard's host blacklist implementation has a number of drawbacks:
NetGuard ignores the IP addresses in the hosts file, because it does not route blocked domains to localhost.
Wildcards are not supported due to performance and battery usage reasons.
It is not possible to edit the hosts file (change/add/delete domain names) with NetGuard
Also:
- Host blocklists have to be updated manually.
- You can't view exactly which domains have been blocked.
- You can't create your own custom DNS resolutions: This is necessary if you're into self-hosting and you want HTTPS without a public domain.
personalDNSfilter overcomes all of these problems, and so for that reason I strongly recommend it.
Installing personalDNSfilter
This one's easy. You can either install it from F-Droid (using AuroraDroid), or you can install it from the playstore. They're both the same.
After installing the app, tap on "Advanced settings" and make them match this:
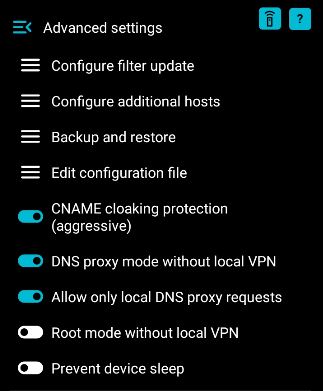
What we're doing here, is configuring pDNSf so it doesn't use a VPN slot, but instead opens a "DNS proxy" on port 5300.
Installing the SOCKS5 proxy
Now, you must launch the Google Playstore from within Island:
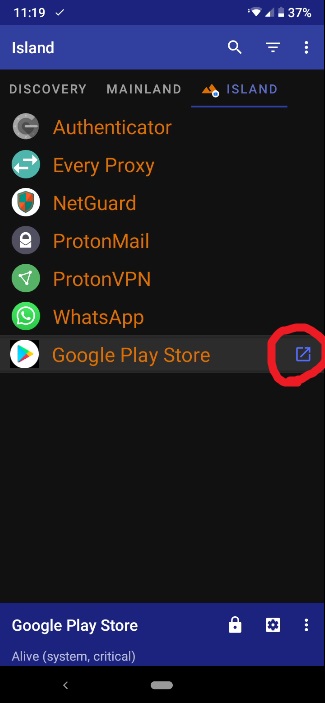
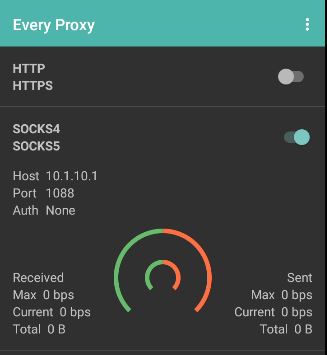
Now search and install "Every Proxy". "Every Proxy" has no ads, and no trackers, hence, why I picked it. Make sure NetGuard is up and running on the main profile, and then launch the EveryProxy app, and hit the three dots on the top left corner, then "Settings". Scroll down to the bottom and make your settings match this:
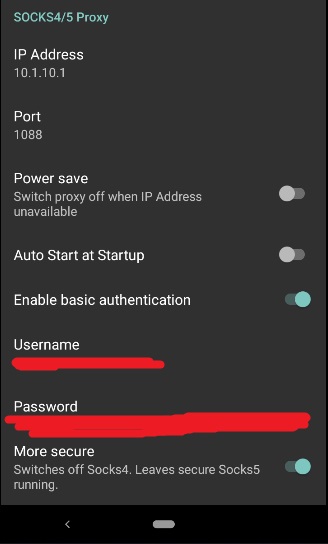
Of course, you must create a username and password. You don't really need to remember the password. Just copy it to your clipboard. (IMPORTANT: DO NOT make the password 126 characters long, else netguard will enter a crash loop that might crash your entire phone). Now go back to the main screen of the app, and start the SOCKS5 proxy. Make sure to disable battery optimizations for "Every Proxy", else Android might kill the app unexpectedly. If you don't know how to disable these optimizations, go to dontkillmyapp.com.
Configuring Netguard
Now you must go back to your main profile and open Netguard. Do NOT "Deactivate" the work profile.
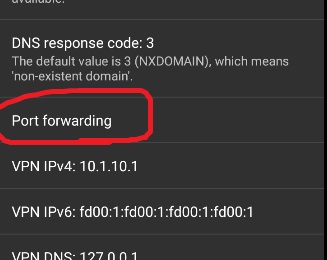
Here's the tricky part. Go into NetGuard -> Three Dots (on the top right corner) -> Settings -> Advanced Options -> Port Forwarding
Once you're inside that menu, click the "+" icon on the top right corner. Make the details match the following screenshot:
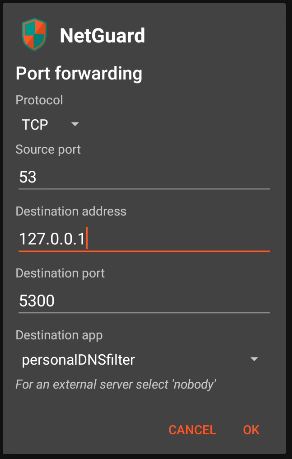
Click OK. Now do the exact same thing again, but instead of selecting "TCP", select "UDP".
Basically, what we're doing is configuring netguard so whenever an outbound DNS request goes through port 53, it will be redirected to localhost (127.0.0.1) to port 5300 to personalDNSFilter. We use port 5300 because that's the only port that pDNSf can work on without having root, without occupying the VPN slot.
Now go back to the main screen of the app. Look for "personalDNSFilter" and untick the "Apply rules and conditions" checkbox:
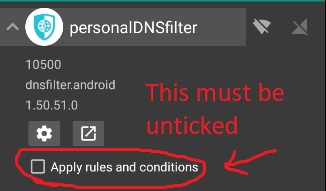
We do this so that there isn't an infinite DNS loopback: For example, if Google Chrome wants to resolve example.com, then the request will go through NetGuard, which will use 127.0.0.1 as the DNS resolver. pDNSf will resolve it according to its configuration, but when it makes the outbound dns resolution request to it's configured DNS servers, that request will be caught by NetGuard, which will try to resolve it using 127.0.0.1, so pDNSf requests tries to resolve it, but its caught by NetGuard, who tries to resolve it using 127.0.0.1, so pDNSf requests tries to resolve it, and so on and so forth....
Now we have to configure netguard to use the SOCKS5 proxy. Go to NetGuard -> Three Dots (on the top right corner) -> Settings -> Advanced Options and scroll down to the section about the SOCKS5 Proxies:
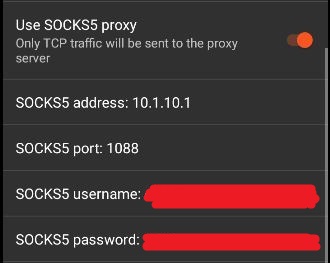
The "SOCKS5 username" and the "SOCKS5 password" must match the username and password that you configured on "Every Proxy".
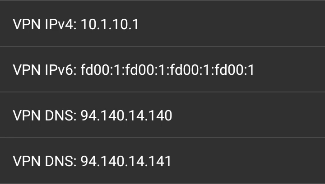
Lastly, we have to configure the VPN DNS. Go to "Settings" -> "Advanced Options" and scroll down. Set both "VPN DNS" settings to any WAN external server (Avoid "localhost", "127.0.0.1", "10.1.10.1", "192.168.0.1", and such. Copy me if you're not sure on what server to use). It doesn't matter what servers you pick here, your DNS requests won't be sent to these servers. The DNS requests will be redirected to pDNSf thanks to the forwarding rule we setup earlier.
Why not just put "127.0.0.1" as the VPN DNS you ask? To put it simply, NetGuard has DNS Leaks which can only be avoided using this hacky method. Without this workaround, who our ISP is would be exposed, and nobody wants that!
If you want more information about how this whole setup works, click here.
Installing the actual VPN
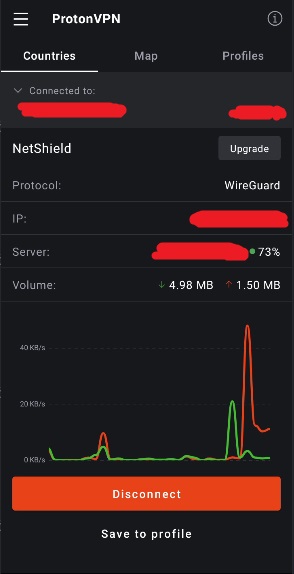
Finally! Just like you installed "Every Proxy" on the work profile, now do the same but instead look for the VPN that you want. In my case, I'll be using ProtonVPN.
After starting the VPN, if you did everything right, you should see some traffic starting to pop up on your VPN app:
You can verify that the VPN is working by going to any of the following sites with the VPN activated:
Just make sure that your browser is controlled by NetGuard, else it will just bypass the entire system.
If you wish to disconnect from the VPN without dropping any packets, do this, in this specific order:
- Disable "Use SOCKS5 proxy" in NetGuard.
- Stop your VPN app and the SOCKS5 proxy on "Every Proxy" (the order of these two steps doesn't matter, hence why they're combined in a single bullet point).
- "Deactivate" the work profile using the notification from Island.
Having trouble?
For a one-time USD$10 donation you can get one-on-one troubleshooting support for any of my guides/projects. I'll help you fix any issue you may have encountered regarding usage/deployment of one of my guides. More info in my Github Sponsors profile.