How to setup Etesync for Tasks.org in Windows

In this blog I will explain how to set up etesync for local use (a server that will only be exposed to your trusted LAN).
If you wish to setup etesync for it to be exposed to the internet, an advanced guide which uses nginx in WSL and internal port-forwarding is available at https://github.com/tasks/tasks/issues/1256#issuecomment-1219065064. I disliked that setup guide because it was too complicated and resource intensive. The setup that I'll explain here uses 0% of CPU and 58.3MB of RAM when the server is idle, and up to 0.6% of CPU when it's working (I have a Intel Core i7-4702MQ CPU @ 2.20GHz). This setup is very lightweight.
Setup etesync for home usage
Installing git and python3
To start, you will need to install git and python. The easiest way of doing this is with chocolatey, so open powershell as administrator and run:
Set-ExecutionPolicy Bypass -Scope Process -Force; [System.Net.ServicePointManager]::SecurityProtocol = [System.Net.ServicePointManager]::SecurityProtocol -bor 3072; iex ((New-Object System.Net.WebClient).DownloadString('https://community.chocolatey.org/install.ps1'))
After chocolatey has finished installing, close powershell and open it again as administrator. Run:
choco install git
choco install python3
Installing etesync
We will now setup the etesync server. To do this, open the Command Prompt (cmd) and run these commands:
cd %appdata%\..\Local
mkdir Etesync && cd Etesync
git clone https://github.com/ItsIgnacioPortal/etesync-server.git etebase
setx etesyncpath %appdata%\..\Local\Etesync\
mkdir etebase_storage && cd etebase_storage && mkdir static && mkdir media
Note that you're using my fork of the etesync-server repo. If it ever becomes outdated and you wish to get the latest version of the server, just take note of the changes I did in requierements-win.txt, then clone the main repo, and apply the changes to the requierements.txt
Now in an administrator command prompt:
cd %etesyncpath%\etebase
pip install -r requirements-win.txt
Now open your favorite text editor and paste this:
[global]
secret_file = secret.txt
debug = false
;Set the paths where data will be stored at
static_root = C:\Users\User\AppData\Local\Etesync\etebase_storage\static
media_root = C:\Users\User\AppData\Local\Etesync\etebase_storage\media

;Advanced options, only uncomment if you know what you're doing:
;static_url = /static/
;media_url = /user-media/
;language_code = en-us
;time_zone = UTC
;redis_uri = redis://localhost:6379

[allowed_hosts]
allowed_host1 = your.local.domain.here.com

[database]
engine = django.db.backends.sqlite3
name = db.sqlite3

[database-options]
; Add engine-specific options here, such as postgresql parameter key words

;[ldap]
;server = <The URL to your LDAP server>
;search_base = <Your search base>
;filter = <Your LDAP filter query. '%%s' will be substituted for the username>
; In case a cache TTL of 1 hour is too short for you, set `cache_ttl` to the preferred
; amount of hours a cache entry should be viewed as valid:
;cache_ttl = 5
;bind_dn = <Your LDAP "user" to bind as. Must be a bind user>
; Either specify the password directly, or provide a password file
;bind_pw = <The password to authenticate as your bind user>
;bind_pw_file = /path/to/the/file.txt
Save it in C:\Users\User\AppData\Local\Etesync\etebase (replace your username there) as etebase-server.ini
Note that in that file you have to modify the value of "static_root" and "media_root" so it has your correct windows username. Also, here is where we select what domain we'll be using. No, you don't need to register any domains, we'll do all of this locally. But we must pick a domain name for HTTPS to work. So in that file replace "your.local.domain.here.com" with whichever domain name you want.
Now in the command prompt run:
python %etesyncpath%\etebase\manage.py migrate
We need to tell windows what our domain name is. Open a text editor as administrator and open "C:\Windows\System32\drivers\etc\hosts". Add these lines at the bottom of the file:
#etesync server
YOUR-PC-WIFI-IP-ADDRESS your.local.domain.here.com
Finally, run:
cd %etesyncpath%\etebase
uvicorn etebase_server.asgi:application --host your.local.domain.here.com --port 8001
And your server will be live! Though the setup isn't done yet. Press CTRL+C and run these commands to setup some files and create an administrator user (Note: when you type the password, it won't be visible. Be careful with how you type!)
python %etesyncpath%\etebase\manage.py collectstatic
python %etesyncpath%\etebase\manage.py createsuperuser
Now the setup for the server is done. We now have to setup the web interface. Download this file: https://pim.etesync.com/etesync-web.tgz and extract it in C:\Users\User\AppData\Local\Etesync\ so that index.html is at C:\Users\User\AppData\Local\Etesync\etesync-web\index.html using 7zip. You'll have to install 7zip if you don't already have it installed:
choco install 7zip
To have HTTPS you must follow this tutorial. It's fairly complicated, but it's needed to have a secure connection with our server. After you've generated your rootCA.crt you have to install it in your windows PC, and in your phone.
- Double click your rootCA.crt
- Install certificate...
- Store location -> Local Machine
- Next
- Browse -> "Trusted Root Certification Authorities"
- Then finish the setup
For android, the setting to install a custom certificate was in Settings -> Security & Location -> (Advanced) -> Encryption & credentials -> Install from SD card (You don't actually need an SD card to use this option).
Start the servers:
cd %etesyncpath%\etebase
python -m uvicorn etebase_server.asgi:application --port 8001 --host your.local.domain.here.com --ssl-keyfile="C:\Users\User\AppData\Local\Etesync\cert\server.key" --ssl-certfile="C:\Users\User\AppData\Local\Etesync\cert\server.crt"
In another terminal:
cd %etesyncpath%\etesync-web\
python -m http.server 8002 --bind your.local.domain.here.com
Setup groups and your user
Now to setup the etesync users go to https://your.local.domain.here.com:8001/admin in your browser. There you need to enter the admin credentials you setup earlier.

Now you will have to create a group. Go to Groups -> New
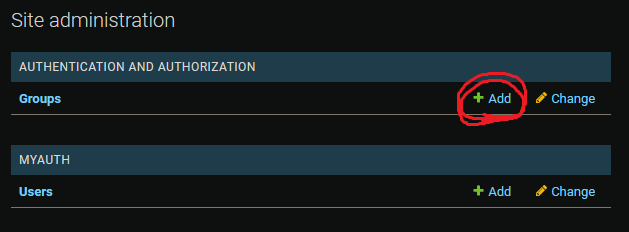
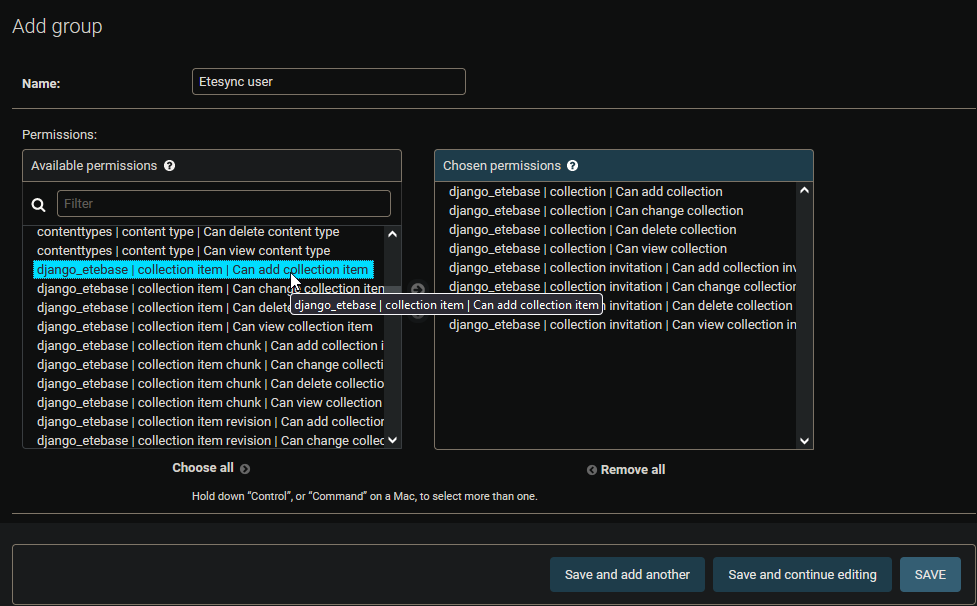
And now name your group Etesync users. Below you have to double click ALL of the options that start with "django_etebase" until they're all in the right side. When you're done click save.
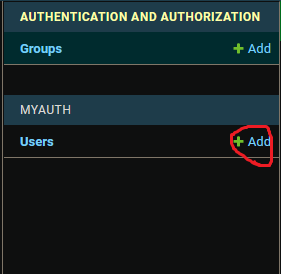
Once that's done, click on Users->New on the left side-bar
Pick a username, then continue. Before continuing to fill the form, set the user's password by clicking on the tiny link on the left:

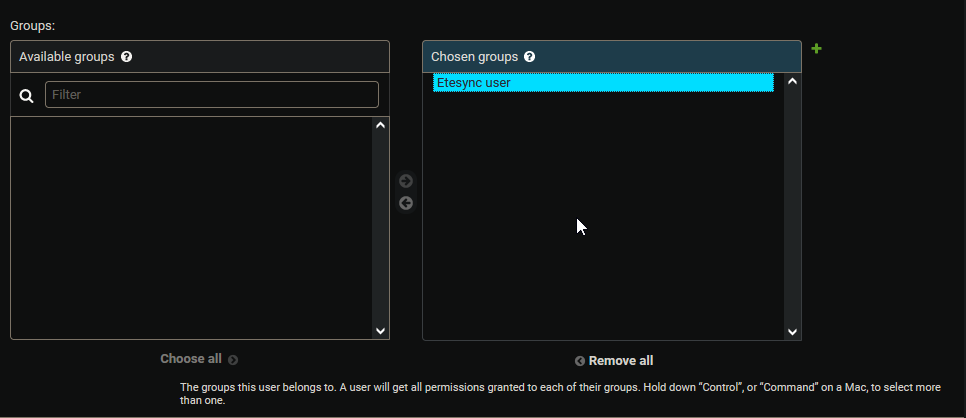
Set your password and hit continue. Fill in your user information, and then add yourself to the "Etesync users" group. Just double click on "Etesync users" in the Available groups menu, then click SAVE.
Next we'll create a firewall rule to allow your phone to be able to talk to your etesync server. Open a command prompt as administrator and run:
netsh advfirewall firewall add rule name= "Etesync TCP" dir=in action=allow protocol=TCP localport=8001
netsh advfirewall firewall add rule name= "Etesync UDP" dir=in action=allow protocol=UDP localport=8001
And that's all done on the PC side! Now for the android setup:
Setup tasks.org
To setup your domain in android, there's several ways. The options available are
Since personalDNSfilter doesn't need any external services, and it's open source, that's what I'll use here. Just go through the app setup, and when you're done go to Advanced settings -> Configure additional hosts and add your domain name according to the format explained there:
>your.local.domain.here.com PC-IP-ADDRESS
If you're a NetGuard user, you might have to enable Three dots -> Settings -> Network Options -> Subnet routing. If you would like to use NetGuard and personalDNSfilter at the same time, check my other blogpost: How to use NetGuard + personalDNSFilter+ Any VPN, without root, without external self-hosted servers.
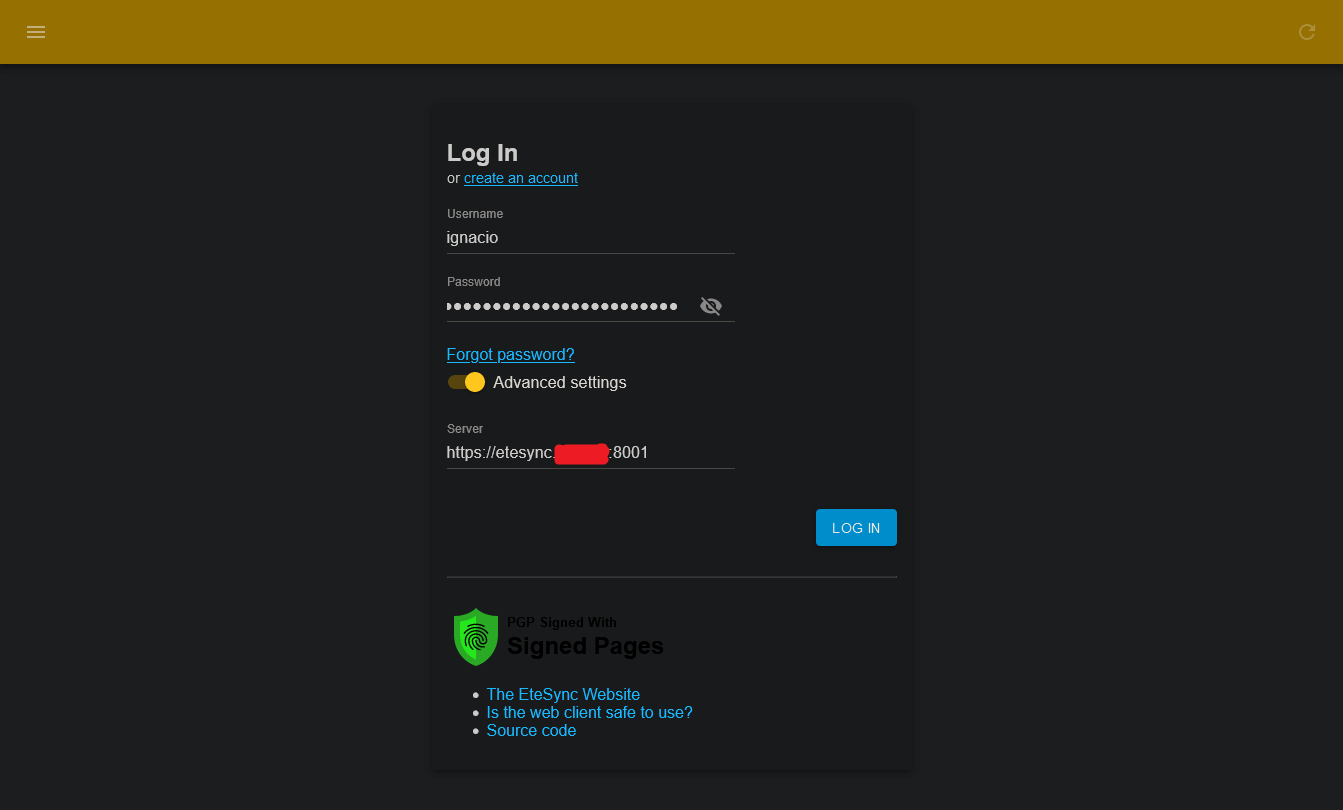
Now go to the Tasks.org app -> Settings -> Add account -> EteSync and then write the username and password that you setup earlier in django. Enable "Show advanced settings" and set the URL to https://your.local.domain.here.com:8001
After that hit the save button and you're done! Etesync is up and running. You can access the web interface in your PC on http://your.local.domain.here.com:8002
Note that in that page you will also have to enable "Advanced settings" and set the URL to https://your.local.domain.here.com:8001
If you're a firefox user you might get stuck in "Deriving encryption". If that's the case, you have to disable enhanced tracking protection and whitelist your domain in uBlockOrigin. You might also have to clear the cookies and local storage if it gets stuck during sign-in. The easiest way to do that is by using Cookie Auto Delete:
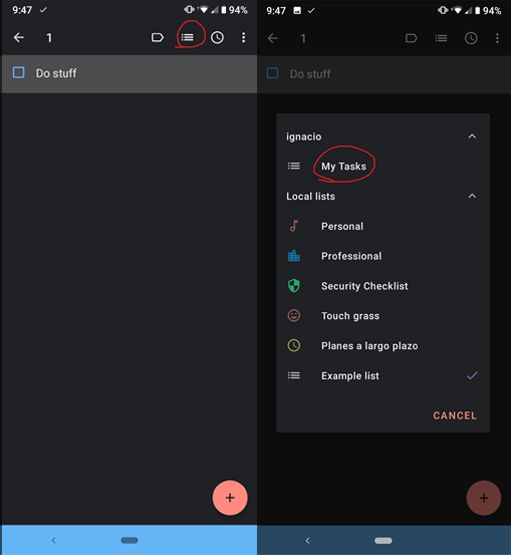
Here's how the tasks menu looks in etesync as of writing this:
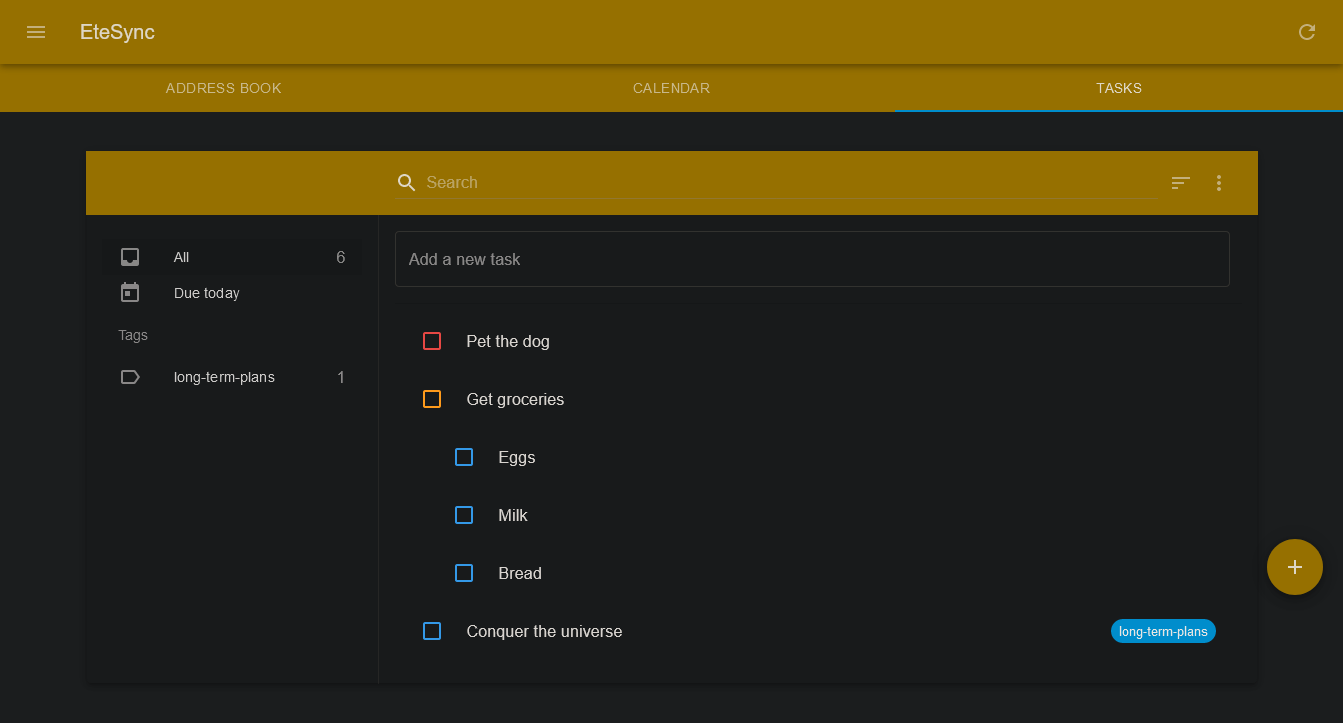
Note that Tasks.org won't immediately upload all of your lists to your etesync instance. Instead, a new section will appear in the sidebar with your etesync username. To get your tasks to etesync you will have to select them, and then move them to their corresponding collection in etesync:
You can use the script below on your PC to quickly start the etesync server and it's web interface. Just save it in a file and double click it to launch it. Press CTRL+C on both windows to stop the server.
@echo off
start cmd /k cd %etesyncpath%\etebase ^&^& python -m uvicorn etebase_server.asgi:application --port 8001 --host your.local.domain.here --ssl-keyfile="C:\Users\User\AppData\Local\Etesync\cert\server.key" --ssl-certfile="C:\Users\User\AppData\Local\Etesync\cert\server.crt" ^& pause ^&^& exit

cd %etesyncpath%\etesync-web
python -m http.server 8002 --bind your.local.domain.here & pause && exit
Having trouble?
For a one-time USD$10 donation you can get one-on-one troubleshooting support for any of my guides/projects. I'll help you fix any issue you may have encountered regarding usage/deployment of one of my guides. More info in my Github Sponsors profile.